
Sandton, Gauteng, South Africa
Monday to Friday
Marksheet Manager Term4 2024
Hello good people. Please see the summary below on the marksheet manager settings and processes for your Term4 marksheets. We will put out another set of notes on using QuickSAVE. Please still use the Facebook group to keep abreast of any live news broadcasts. (note, that the issue with grade 4 – 6 LS still requires a patch from SASAMS which all of South Africa is still waiting for).
Automated Batch excel marksheet manager settings screen:

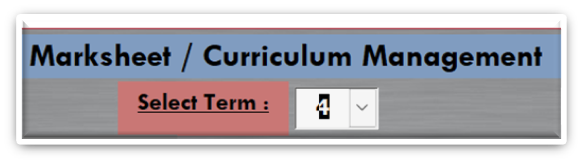
- Term Selection: Choose Term 4 in the term selection box:
2. Choose Template:

Templates version 9 to 11 are all compatible.
With version 11 you have the option to have all the unused column removed in the final marksheet by putting a number 8 in as above. There is only one Stats Box at the bottom of the marksheet, and there are signature fields to make the marksheet suitable for Sams Moderation Meetings.
Version 11 is also required if you want to use the “Export All Learners per Subject”. (see more below)
3. Marksheet Headings and RD’s: The heading will default to RD4 above the Sams Year column.
The RD number determines which ReportColumn is imported into FO. You can put any RD number (1-12) above any of the columns. Typically, the SamsYear column is imported into RD4 in FO as the year mark.
The following other options are also available:
The Sams SBAYear column can be used in calculating the Report mark (Instead of the SamsYear Column) – Tick under the SBAYear column.

If you want to have teachers enter another mark in the marksheet to be uploaded to Fo or used in the ReportMark calculation you can enter a heading here:
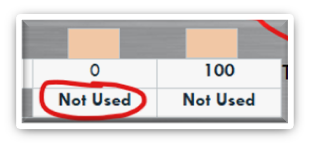
If you want the last heading to be Report Mark – then enter it in the second “Not Used” column above.
The weight of the various columns can be entered in the weight fields:

In the below example, the second column has been called Exam Mark and is weighted 60% while the sams SBAYear column has been marked as 40%:

The other option available is to have no ReportMark calculated (ie you use the SamsYear calculation as the final mark in FO on your report cards:

This can also be used if you want to have the teachers add additional marks where the final calculation of the report mark is done in FO:
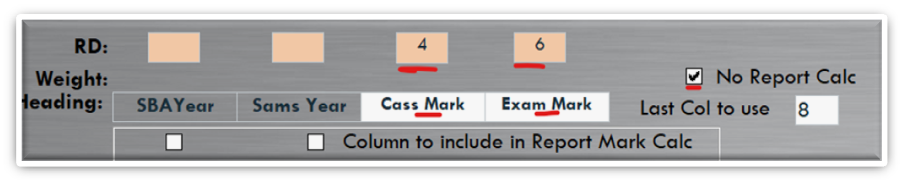
In the above instance the Sams Mark is not used at all in FO.
Note that whatever is chosen above – the SamsYear mark is always sent to SaSams, even if it is not used in FO. (Unless you do not run the Sync To Sams Option-in which case no marks are sent to sams)
4. Curriculum Sheets: Before exporting any marksheets, export the curriculum sheets for all subjects. One sheet is created for each Subject for each grade – it outlines the curriculum plan for the 4th term as per SaSams.
Make them available to the Subject Heads. The Subject Heads need to check (A)the number of tasks, (B)the weighting for each task and (C)the max mark for each task. They should mark anything they want to change and then those changes should then be made by Admin in SaSams before creating the final Term4 marksheets.
5. Where to Save the Marksheets:
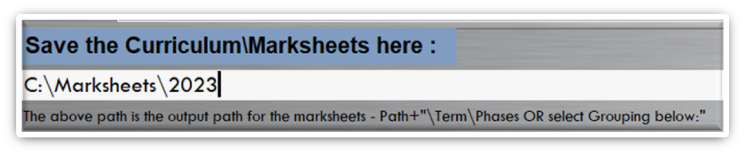
This path can point to anywhere on the local machine or the server.
It is strongly advised to use the format above – ie add the year to the path.
The Marksheet manager will automatically create a folder below the above path called Term4.
(So if you have “Term4” in your path the marksheets will end up in C:\Marksheets\2023\Term4\Term4)
6. How to use the View Log File feature:
When you create marksheets, they are recorded in the Log File. That way you can check which marksheets have been done and when (time/date is important in case you had to redo a marksheet and need to know if it had been done)

There is also the “Skip if done” option:
If this is ON, when you select a grade to create marksheets, only marksheets that have NOT been done before, for that grade will be created. This means that when you want to redo a marksheet, you just delete it (or them) from the log file then select the grade and click Create Marksheets. You can therefore recreate many marksheets. For instance all for the same Teacher, or all for a particular Subject.
7. How to choose which Marksheets get Created:

- Before you click Create Marksheets you have 3 ways to decide which marksheets will be created.
1. We mentioned above – use the Log file (only marksheets not in the logfile will be created).
2. You can select a single marksheet in the Optional box, which offers a dropdown of all the possible marksheets. Then you do NOT have to select a grade.
3. If you did not choose a single marksheet in 2, then you must select at least one grade (you can select multiple grades).
8. Choosing the Correct Grouping Option: This determines which folders the marksheets are saved in.

1.If you choose none of the grouping options, then the marksheets will be saved in folders called Term4\Phase 1(Grade0-3), Term4\Phase2(Grade4-6), Term4\Phase3(Grade7-9) or Term4\Phase 4(Grade 10-12).
2. “Group by Teacher” and “Group by Subject” should be self-explanatory.
3. No Groups will put all the marksheets in the Term4 folder sorted alphabetically by their TTCode. It is thus very easy for teachers to find their marksheets. They just need to remember their TTCode.
9. How to Create Marksheets with marks:
Any marksheet that has previously been imported and the marks have been synced to Sams, can be recreated “With Marks” – ie you are now in term4 and a marksheet that was done in term1 can be created with the marks that were previously imported and synced to sams.
If you select this option in the current term and the marks have not been synced to sams then the option will be ignored.
10. How to Create Marksheets for All Learners in a Grade for a Subject – ie Not per class:
This option allows you to print marksheets which have all the learners on it for a particular Grade/Subject – similar to selecting ALL Learners on an a sams marksheet. (ie NOT by Class). The learners are listed in alphabetical order.
11. What to do about missing SBA Marks from Previous Terms:
If you generate a marksheet in Term4 the SBA marks from previous terms will be shown on it:
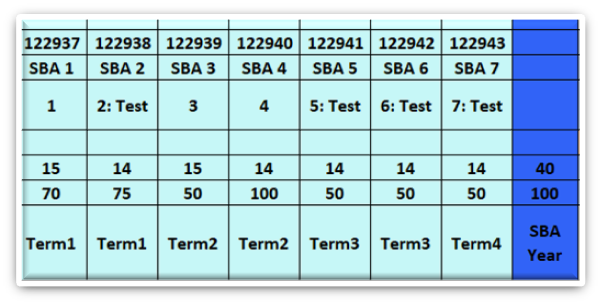
If any of the marks from previous terms is missing it will be coloured red as follows:

You CANNOT capture the missing marks in the Term4 marksheet. You must recreate the marksheet for the relevant term (Term1 above) and have the teacher capture the missing marks. You then re-import the marksheet and sync the marks to sams. Then you must re-create the Term 4 marksheet for the marks to show.
12. Importing Marks:
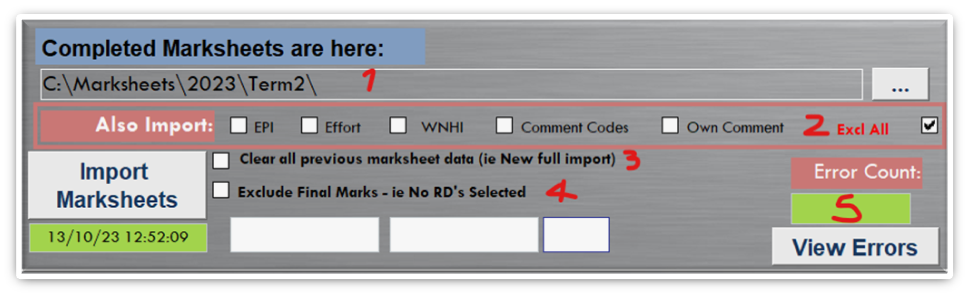
1. We recommend that you move completed marksheets into a folder designated specifically for these completed marksheets ( move them DO NOT copy them). Once they have been imported, them move them to a separate folder called “Imported”. Any that have errors and need to be attended to before importing them again should first go into an “Errors” folder. Once the errors have been attended to move them again into the Completed folder ready to be imported again.
2. If you have any of the optional elements on the marksheet that need to be imported you need to tick the appropriate boxes or Excl All if you have none.
3. Only required at the beginning of each term, or if you want to do a completely new import of all the data for a term.
4. If none of the columns on the marksheet are to be used in FO – ie you import marks from Sams at a later time, then tick this box.
5. If there are any errors during the import process the error count will show here. Click on view errors to see them. Contact support for assistance with the cause of the errors. The primary reason for errors is if Learners are duplicated on 2 marksheets of the same subject, Marks have been allocated in excess of the Max mark for a subject or a marksheet has been duplicated.
13. Post Marks to FO:
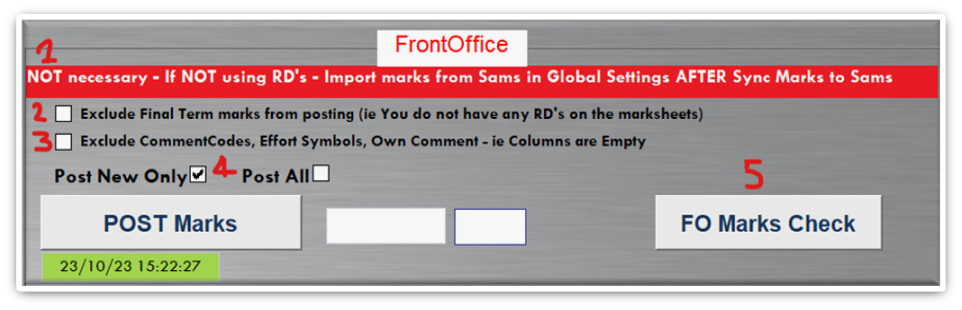
1. If you do not import marks into FO, then you do NOT need to run the Post Marks function.
2. If you do not import marks, but you do want to import Comments, Comment Codes or other Optional data, then tick this box.
3.If you do not import any of the optional extra data, then tick this box.
4. Leave the “PostNew Only” ticked unless you specifically want to reimport all the marks. Marksheets can be imported in batches. With this ticked only the lates marksheets will be posted saving time and not overwriting previous data.
14. FO Marks Check Button:
5. At any time after posting marks, you can open this marks check function to filter on various columns to check what data has or has not been imported yet.
15. Split Marks:
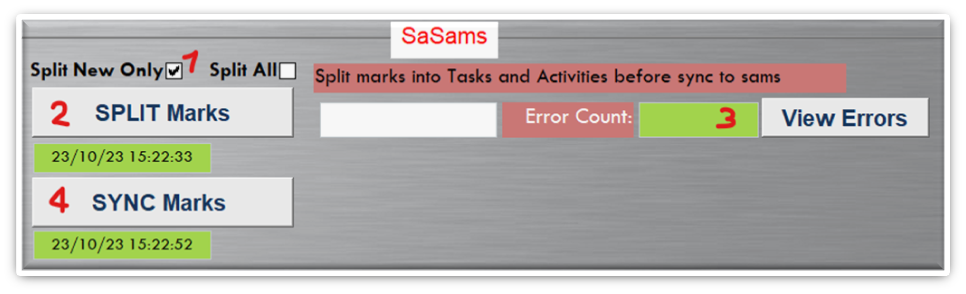
1. Leave this option ticked unless you want to Split all the imported tasks and activities again.
2. Click this button to begin the Split process. Sams marks are divided into Tasks some of which have activities linked to them. In sams these are stored in different tables and therefore need to be split after importing marks from the marksheets.
3. Any error during the split process are stored in a log file. Click view errors to see what has caused these errors. Contact support for help in correcting the errors.
16. Sync Marks to Sams:
4. Once the split is complete you can sync the final marks to sams. This function always transfers all the marks for the current term. Any changes that may have been made in sams before the sync will be overwritten. This is by design. Marks should not be captured in both sams and the marksheets unless certain subject classes are not captured via the marksheets.
Recent Comments